One of the things that we want to do with Reisormocap.ca is to go beyond simply providing motion capture files for use in Poser. We want to be able to turn this site into a resource for Poser animators, thus unleashing this powerful piece of software and enabling people to create their own animated short films and projects.
If you read through the articles in the site you’ll see that we’ve already taken steps to do this. We’re hoping to provide our readers with the inspiration and resources they need to help them learn to animate within Poser. Starting with this article, we’re adding a new section to this page for tips, tricks, and techniques. This section will be an ongoing collection of articles that will provide shortcuts, tutorials, and interesting tricks to use when animating with Poser.
We’re going to be starting this off with a tutorial on how to create multiple external Runtimes in order to show one way to help people organize Runtimes and migrate their contents into multiple external Runtimes quickly and easily.
Just about every Poser user has experienced the problem of Runtime bloat. Because there is such a wealth of low-cost and even free content available to Poser users online, it becomes very easy for Runtimes to approach several Gigabytes in size. Of course as the Runtimes grow (and because of the file dependencies between Poser figures, props, poses, and textures) they tend to become confused messes that are both difficult to navigate and reduce productivity to a crawl. The solution then, is to look at the employing a multiple, organized Runtimes in order to create a logical and easy-to-navigate file structure.
Migrating Poser assets into multiple Runtimes can be a daunting and mind-numbing task of re-installing each and every asset by hand. Given Poser’s system of file dependencies among its assets, re-installation is the only way that migration works. Simply trying to move assets within the Runtime or even move the assets to an external Runtime stands an excellent chance of breaking the file dependencies and making the asset unusable. Trust us on this.
By using multiple external Runtimes, we can organize the content in a way that makes sense to us as users. Fortunately, this is a relatively easy process. And with the right tools, a bit of planning, and a bit of know-how, anybody can end up adding Runtimes reaching up into the hundreds of gigabytes with very little difficulty.
Let’s get started.
Step One:
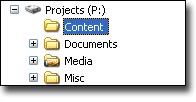
We’re going to start by recommending that you prepare a Content directory. Now, a Content directory is going to hold all of your multiple external Runtimes. By having all of your external Runtimes in a single directory it’s going to make it very easy to back up all your Poser content by simply backing up the one directory. You can name it your content directory anything you want, such as “Poser Runtimes”, “My Runtimes”, “Poser Stuff” — anything at all really. For the purpose of this tutorial we’re going to refer to it as “Content”.
Let’s start by selecting a location for your Content directory. It’s usually best to do this on the root level of a drive rather than burying it several folders deep. This will keep the directory path fairly short, and you’ll be able to navigate to the content directory fairly easily.
So, create a new folder on the root level of your drive, and name it “Content.”
Though you may be tempted to put some external Runtimes in the My Documents directory, we actually advise against this. The reason for this is to keep the directory path fairly short since Poser 7 has a limit on filename length.
Step Two:
At this point, it’s time for you to decide on how you want your content organized. You can organize it in any way that makes sense to you, but we’ve found that a functional approach is probably the best. Below is a sample listing we use for our external Runtimes. You can use this as a template to build your own external Runtime structure.
- ContentAccessories_Ancient
- ContentAccessories_Buildings
- ContentAccessories_Buildings_Ancient
- ContentAccessories_Exterior_sets
- ContentAccessories_Fantasy
- ContentAccessories_Historic
- ContentAccessories_Horror
- ContentAccessories_Household
- ContentAccessories_Interior_sets
- ContentAccessories_Military
- ContentAccessories_Misc
- ContentAccessories_SF
- ContentAccessories_Vehicles_Air
- ContentAccessories_Vehicles_Land
- ContentAccessories_Vehicles_Water
- ContentAccessories_Weapons_Historic
- ContentAccessories_Weapons_Modern
- ContentAccessories_Weapons_SF
- ContentClothing_Everyday
- ContentClothing_Fantasy
- ContentClothing_Historic
- ContentClothing_Military
- ContentClothing_SF
- ContentFigures_Animals
- ContentFigures_Hair
- ContentFigures_Monsters
- ContentFigures_People
- ContentFigures_Robots
- ContentProjects
When you decide on a file structure, start creating and naming folders within your Content directory. It’s best to choose short, descriptive names so that you can readily identify these Runtimes within Poser.
Organizational Tip: Given the vast amount of female clothing available to the Poser community, it may be worthwhile to split the Clothing_Everyday external Runtime into several runtimes categorized by the figure type.
Step Three:
Now, we’re going to go into each of the folders that you created in the Content directory, and we’re going to create another folder in there. Name this new folder Runtime. This folder is what will allow Poser to recognize the external Runtime as a Runtime it can add to its libraries. Make sure you do this for every external Runtime folder in the content directory.
Step Four:
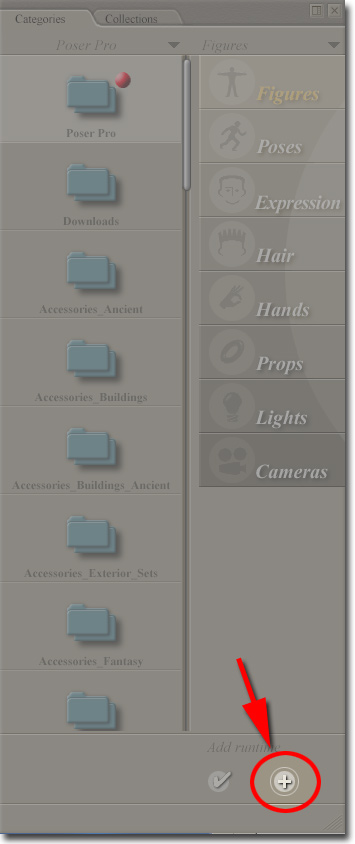
Let’s open up Poser, and go to the libraries window. Use the blue folder at the top of the categories palette to navigate upwards in the runtime directory as far as you can go. You should see a blue folder with a red dot beside it, just like the picture below.
To add an external Runtime directory to Poser’s list of Runtimes, click on the “+” at the bottom of the libraries window. This will open up a requester that will have you navigate to the external Runtime that you’ve just set up within your content directory. You only have to navigate to the external Runtime folder and not the Runtimes subfolder within there. Click on OK, and Poser will add the external Runtime to its list.
Repeat this for every external Runtime that you’ve set up in the Content directory.
Step Five:
At this point, you have a lot of Runtimes added to Poser but they’re all empty. Now, we’re going to start putting content in there.
We’re going to create a mirror of the folder structure in your Content directory and use this as a means of organizing all the installers, archives, and zip files that hold all of your Poser assets.
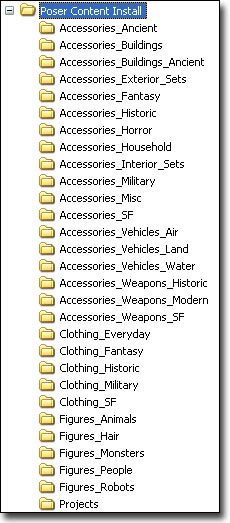
Create a new folder on the root level of your drive, and call it Poser Content Install. Now, go into your Content directory and select all the external runtime folders and copy those folders into the Poser Content Install directory.
This is where the grunt work comes in. Take your Poser installers and zip files and move them into the appropriate subfolder in the Poser Content Install directory. While you’re at it, rename the Runtime subfolder in each category to Installed. Also, create another subfolder in their and name it Manual Install. We’ll use these folders to sort out content that has successfully been installed, or that needs to be installed manually later on.
One of the added benefits of consolidating all your installers in a Poser Content Install directory is that it makes it easy to back up all your installers onto multiple CDs or DVDs. It’s good to have that available in the event of a hard drive failure or even if you just want to re-organize and re-install your external Runtimes.
Step Six:
If you’re going to manually install all of your Poser content into the external Runtimes, then here’s the procedure that we’re going to follow:
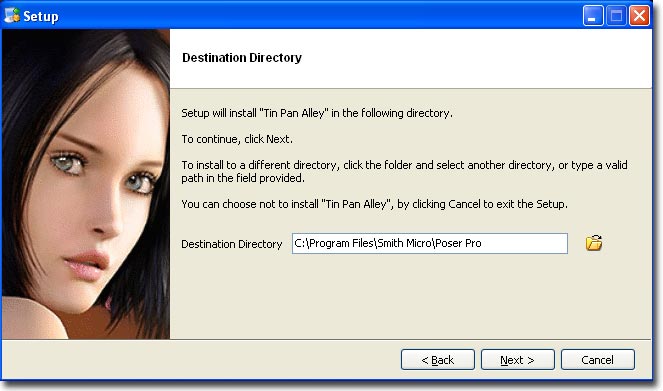
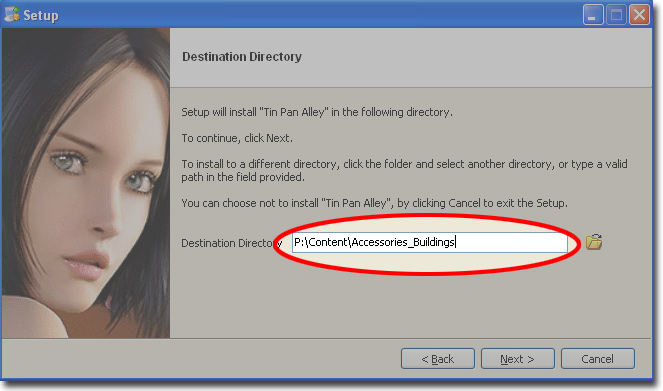
A. For a Daz-type installer, activate the installer and go through all of the activation screens until you reach the following screen:
By default, the Daz-type installers will want to install into the internal Runtime. However, we can redirect the installer on this screen to install the content into our chosen external Runtime. Simply enter the directory path of the chosen external Runtime in the space provided. So, if you want to install a file into the Accessories_Buildings external Runtime, enter the directory path like this:
Once you have successfully executed the installer, and the content is in your chosen Runtime directory, move the installer into the “Installed” subfolder to to get it out of the way now that you’re finished with it.
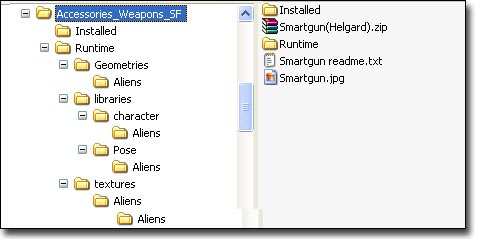
B. For a zip file installer, extract the zip file right into the same directory, like this:
Do this for all the zip files in the category. If the zip files are packaged properly, they should all extract into a Runtime folder in the same directory. Once you have finished extracting them, move the Runtime folder they created into the external Runtime of your choice.
Step Seven:
Once you’ve done an install or series of installs, you should check in Poser to make sure that everything was installed okay. Try loading up some of the assets within Poser. If there’s a problem, you can use an uninstaller to remove the content, or you can go into the external Runtime and delete the problem file(s).
Step Eight:
If you run into problems with the install, such as with a zip file that doesn’t have the proper Runtime file structure packaged within it, then you’ll have to manually move the files over into the appropriate external Runtime one by one and make sure that they go into the right folders.
Tips and tricks:
There is some content that really should be installed into the internal Runtime. We installed the Daz Millennium figures such as Michael 3, Vicky 3, and Vicki 4.2 into the internal runtime. Some of these files actually search for a Poser.exe file before loading, and so having them in the internal runtime allows them to load without difficulty. We also make sure that Python scripts are also installed into the internal Runtime.
We hope that you enjoyed this tutorial, and we look forward to bringing you more soon.

10:55 am
Does this tutorial work for OS X 10.8.3 , 2013 on Poser pro . If not , do you have a tutorial for the Mac …………. Thanks
4:15 pm
Hi Andy. Unfortunately, I don’t have a definitive answer for you as far as Mac goes. My understanding is that the Runtime file structure is the same, so the logic of organizing your runtimes should work. I would direct you to the forums on Daz3d.com or Renderosity to ask the other users there. They would be able to provide you a better answer than I could.